Wednesday, February 27, 2013

Macaroni and Cheese

A fast, yet tasty recipe that far exceeds the stuff in the blue box.  Add your favorite cheese to a basic white sauce, throw in some seasonings (such as black pepper, garlic powder or onion powder) and you have a creamy homemade mac and cheese tailored to your taste!  This recipe is fun to play around with as different cheeses can give it such a different flavor.


Start out by beginning to cook up the pasta of your choice per the box directions.  While you wait for the water to boil for the pasta, you can start making the white sauce, which you can find the recipe for here.  Once the white sauce has thickened up a bit, add in a few handfuls of cheese.  Be generous!


Gently stir the cheese into the sauce.  Go ahead and turn the burner off as the white sauce is hot enough to efficiently melt the cheese.


Continue to stir until the cheese has melted completely.  You will be left with a thick, rich cheese sauce.


At this time, you can add in your favorite seasonings, then pour the sauce over your cooked and drained noodles.  Stir well, then serve it up!


Tuesday, February 26, 2013

Banana Bread

Whenever I have overly-ripe bananas on hand, I love to make banana bread.  Sometimes I will buy new bananas and save the older ones simply so that I can make a couple of loaves of one of my family's favorites.  You can keep it as plain as you like, or dress it up with the addition of chocolate chips or nuts.


The recipe posted is for a single loaf; as usual, I double the recipe for the size of my family.

1-2 ripe bananas
3/4 c. sugar
1/3 c. veg. oil or coconut oil
2 eggs
1 1/2 c. flour
3/4 tsp. baking soda
1/2 tsp. salt

Oven temperature: 350 degrees.  Baking time: 55 minutes.

Grab those ripe bananas and remove the peels, of course!


Place the bananas into a small bowl.


Using your favorite mashing method, go ahead and mash the bananas down.  We use the "Egg Masher" in our house.


This is an easy step for kids to help with.  Both J & K helped with this part of the recipe while I measured out the other ingredients.


After a thorough mashing (and repeated requests to please stop mashing!), the bananas will look something like this.  If you aren't as detailed at getting every single piece mashed like my kids were, that's just fine!


Measure out the sugar and oil and place it into another small bowl.


Add the eggs and stir.


At this point, you'll have 3 bowls in use.  One for the bananas, one for the egg/oil mixture, and the largest one containing all the dry ingredients.


Add the mashed bananas to the egg/oil mixture and stir well.


Finally, pour the egg/banana mixture in with the dry ingredients, mixing it well so that no dry areas remain.


Spray a loaf pan with non-stick spray and pour the batter in.  Then place it in your preheated 350 degree oven.


Bake for 50-60 minutes.  The bread will be golden brown, but make sure that it is cooked all the way through in spite of how it appears.  You can test it by inserting a sharp knife or a toothpick into the middle to see if it comes out clean.  Once the bread is done, remove it from the oven and allow it to cool for a few minutes on a cooling rack.


After about 5 minutes, remove the bread from the pan and allow it to cool a bit more...if you can stand to wait that long!  (We normally can't!)


After the bread has sufficiently cooled, slice it up...


add butter...


and enjoy!

Tuesday, February 19, 2013

Spaghetti Pie

I'm not a fan of plain old spaghetti with red sauce.  In fact, if there is an evening I have to be away from my family, that's the night I plan to make such a meal--they can enjoy it and I can avoid it!  Spaghetti pie, however, is really good!


1 # hamburger, browned
1 jar of spaghetti sauce (or make your own)
8 oz. spaghetti (or angel hair) noodles
2 c. mozzarella cheese
sour cream (optional)
1 egg
1/2 cup grated Parmesan cheese

Oven temperature: 350 degrees.  Bake time: 30 minutes.

Get all your ingredients out and ready to go; this is a fast meal to make!  (As usual, I make my own spaghetti sauce, hence the can of tomato sauce in place of where you might have the pre-made variety.)


Bring your water to a good boil.


Add the spaghetti noodles.


Allow the noodles to cook until they are good and soft; then cook for an additional minute.  Since you are going to put this dish into the oven, you don't want to start out with al dente noodles...your end result would be awfully dry and crunchy, which you don't want.


While the noodles are cooking, it's a good time to brown your hamburger, get rid of the excess grease, and mix it (the hamburger) in with the spaghetti sauce.

Once the noodles have finished cooking, go ahead and drain them.  I allow a tiny bit of water to remain with the noodles, again, so that they won't dry out too much during the baking process. 


Place the cooked noodles back into the pot you cooked them in and add the egg and Parmesan cheese, stirring well.


The noodles will now be clumped together.  Pour them into a pie plate and press some of the noodles up against the edge of the pie plate so that there is a slight depression in the middle portion of the noodles.


Next, add whatever amount of sour cream you want, if you choose to use it.  I use about 1 cup, sometimes a little more.  (Notice how the sour cream fits in the center portion of the pie and the spaghetti noodles form the "crust.")


At this point, top the sour cream with your meat and spaghetti sauce mixture.  Reserve a little sauce if you wish, to place on the serving plate underneath the slices when the meal has finished baking.


Spread the meat mixture over the top of the sour cream and spread it out along the edges of the pie, too. This will help to eliminate crunchy noodles.


Finally, add the mozzarella cheese.


Bake, uncovered, for 30 minutes, or until the cheese is slightly browned and bubbly.


Allow the pie to cool for about 5 minutes before slicing into it.  If you reserved any sauce, put it on the serving plates, then top with a slice of spaghetti pie.  Round out the meal with a fresh loaf of French bread and a green veggie.


Sunday, February 17, 2013

German Dark Rye Bread

What do you think of when you hear the words, "rye bread?"  If you're anything like me, you're a bit wary.  I've had rye bread before...and I didn't like it!  But one day I tried this recipe, gave it a taste and what do you know?  I LOVE rye bread!  Turns out that much of the rye bread that is presented to us "out there" also tends to include a little something called caraway rye seeds...and THAT is the flavor I don't care for.  Thankfully, when you make your own bread, caraway rye seeds are optional.  If you like the flavor, go ahead and add it.  But if you think you don't like rye bread, try making this bread and omitting the caraway seeds altogether.  This bread is fantastic on its own or used for sandwich bread, or simply toasted with peanut butter or cream cheese on top.  You can't go wrong!  Especially when you discover that there is **chocolate** in this bread! ;)


3 1/2 c. rye flour
2 1/2 c. bread flour (or all-purpose flour)
2 T. vital wheat gluten
2 tsp. yeast
2 c. warm water
1/4 c. brown sugar
1/4 c. molasses
3 T. cocoa powder
1 T caraway rye seeds--**optional**
2 t. salt
1/4 c. butter, melted

Oven temperature: 400 degrees

Start out by combining your rye and all-purpose flours together in your mixing bowl.  (The rye is the darker flour on the left side of my mixing bowl.)


You also want to get the yeast developing, so go ahead and start that process.  As always, use very warm, but not hot, water--too hot kills the yeast, too cool doesn't activate it as well or quickly.  Add the yeast and the brown sugar to the warm water.


Give the water/sugar/yeast mixture a quick stir, then let it sit while you get your remaining ingredients going for the bread.


Add the salt and vital wheat gluten to the flour in the mixing bowl.


Now for the important part...the cocoa powder!  It, along with the molasses, helps to give the bread its deep, rich color.


At this point, I give the dry ingredients a quick whirl so that they are well combined.  (If you are using caraway rye seeds, this is the time to add them.)


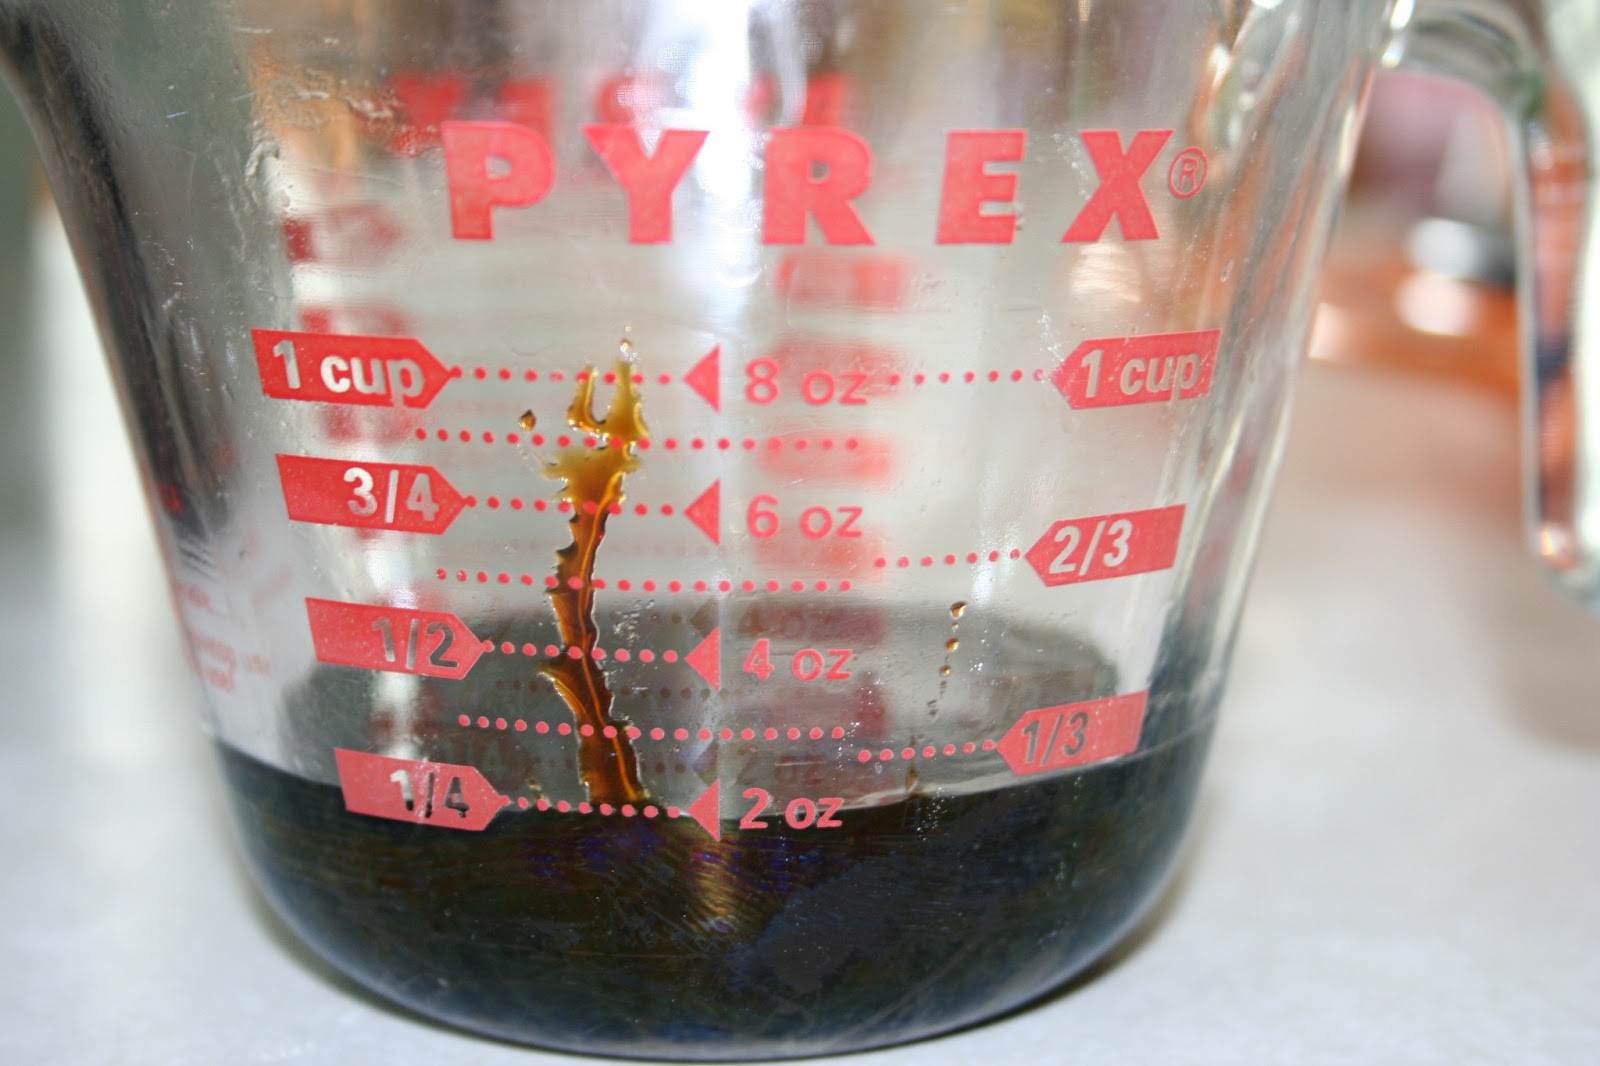
Measure out the molasses.


Here's a hint for you.  Before pouring the molasses into your measuring cup, spritz the cup with non-stick spray.  The molasses will then come out of the cup with ease rather than sticking to the sides.


Also, remember that when you are measuring wet ingredients, you want to get down at eye level with where the numbers on the measuring cup.  If you are standing and looking down at your measuring cup, odds are you will actually be a bit shy of having enough of the liquid.  In this next picture, you can see that at eye level, the molasses measures very close to the 1/4 cup mark on my measuring cup.


Go ahead and pour the molasses into the mixing bowl.


At this point, the yeast has been activated and it's a good time to add it to the bowl as well.


Allow things to mix for a few minutes.


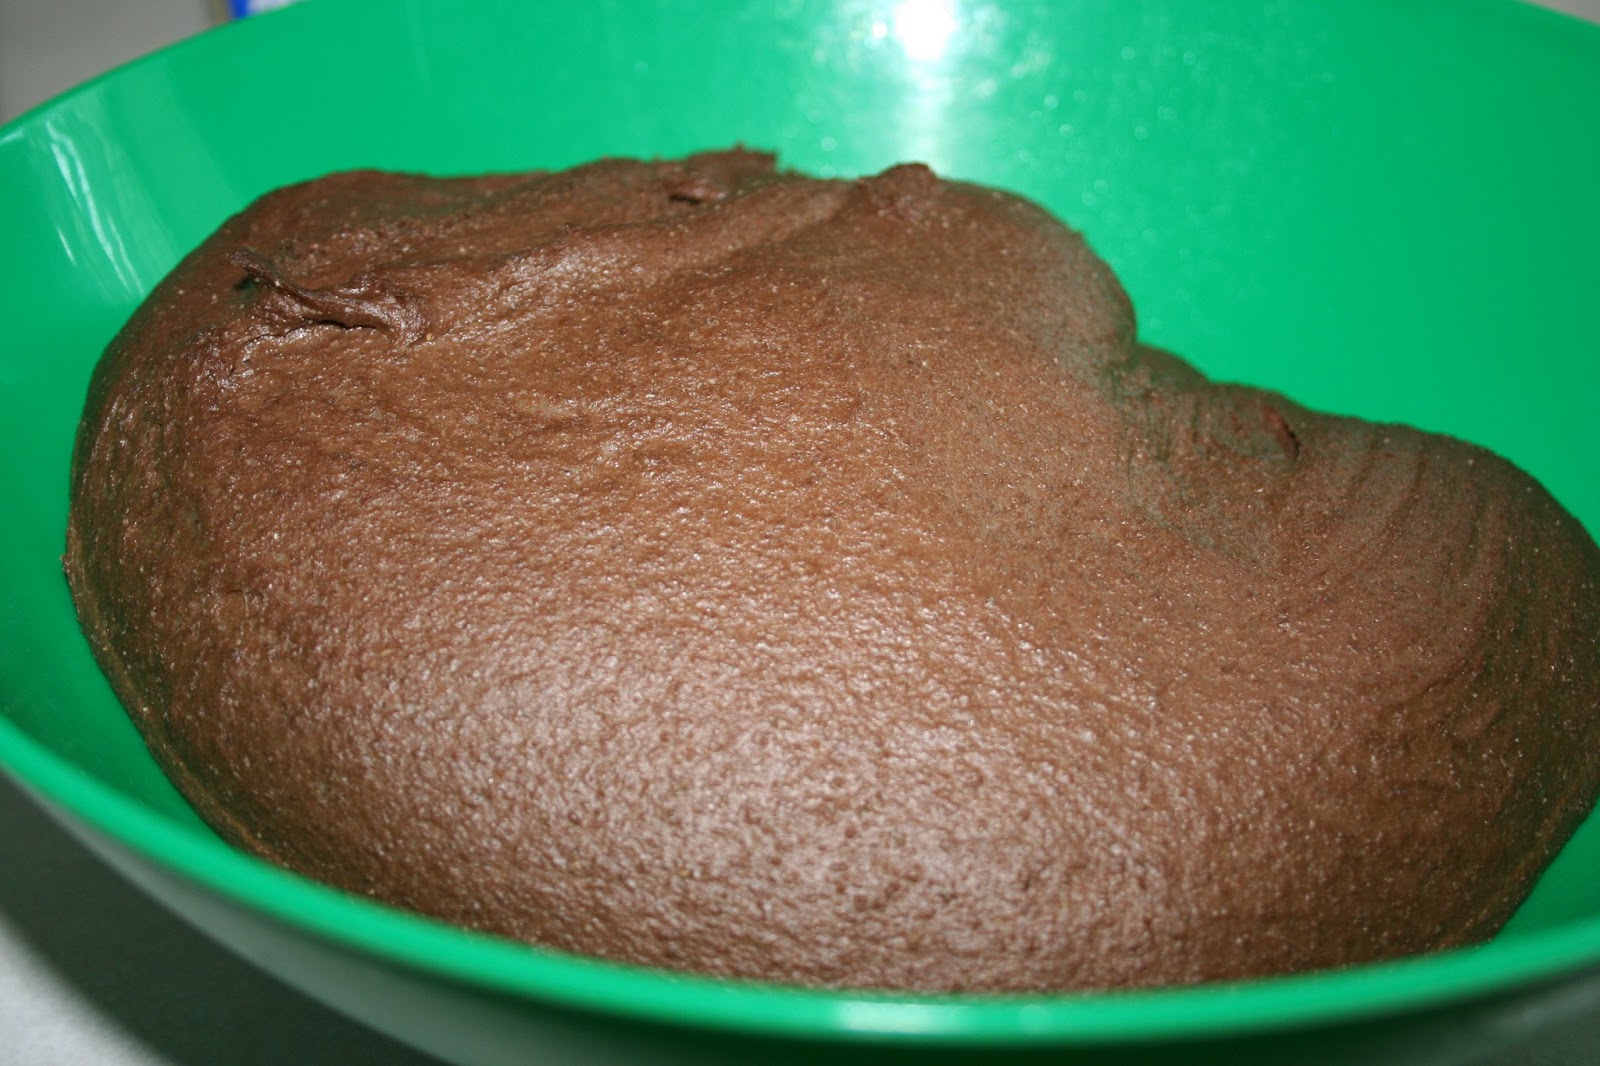
After about 3 or 4 minutes, add the melted butter.  Now the dough will get really sticky.


You can see that the dough sticks heavily to the bottom of the mixing bowl.


With a little time, the dough sticks more to itself than to the bowl.  You'll end up kneading the dough for approximately 8-10 minutes total.


Once the dough is no longer sticking to the bottom of the mixing bowl, you can go ahead and place it in another bowl to rise for an hour.  Spray the bowl with non-stick spray just to make sure the dough doesn't stick to it too much.  Do the same for the plastic wrap you place over the top.  This dough isn't much to look at at this point.  It doesn't look particularly appealing...but don't give up on it yet!

Dough at rest (prior to plastic wrap).


Dough an hour later.  It's not a phenomenal rise, but it has definitely changed.


Pour the dough out of the bowl and shape it to place it into your loaf pan.  Allow it to rise again for another hour.  I purchased an extra-long sandwich loaf pan for this specific recipe.  I love the length of the pan and that it's narrow enough to give the bread good height during the 2nd rise.

Dough at rest once again:


Dough an hour later.  A more significant rise.


As you can see, it's harder to obtain a perfect loaf of bread the longer the pan...but who cares about looks; the taste is what matters!

At this point, it's time to throw it in the preheated 400-degree oven and allow it to bake for 40 minutes.

When the baking time is up, remove the loaf from the oven and allow it to cool for 5-10 minutes in the pan.


After letting it cool for a bit, remove the bread from the pan and allow it to finish cooling on a rack.


You should really let the bread cool fully before cutting into it.  On this particular day, I had children hungrily staring at the bread, so I cut into it soon after it came out of the oven.  So my bread has some darker spots here and there in the middle from all the moisture (steam) that was still very much in the bread.


Still tasted great.  Slather on a little butter and enjoy!