Thursday, October 24, 2013

White Chicken Enchiladas

This can be about as bland or spicy as you like it.  I didn't happen to have any diced green chilies on hand, so I tried to kick up the heat a bit by adding some cayenne pepper.  I guess only the photos look "bland" since everything is white, but don't let looks deceive you.  And add green chilies in when you make it so your dish doesn't look as boring as mine does! ;)


Ingredients:

10 flour tortillas, approx 8" in diameter
2 c. cooked, chopped chicken
2 c. of your favorite cheese--monterey jack, cheddar, or mozzarella (note that cheddar cheese will be a bit greasier)
3 Tbsp. butter
3 Tbsp. flour
2 c. chicken broth
1 c. sour cream
1 4-oz can diced green chilies (optional)

Oven Temperature: 350 degrees
Baking Time: 25 minutes

Combine your chicken and 1 c. of cheese.  I used mozzarella cheese tonight.


Spoon a generous amount onto a tortilla and roll it up.


Place filled and rolled tortillas into a lightly greased 9x13" pan.


In a saucepan, melt the butter and then stir in the flour.  Allow it to cook on medium heat for about a minute.  Then add the chicken broth, whisking until mixture is smooth.  Heat until it's thick and bubbly.


Once the liquid mixture has thickened, carefully add the sour cream and chilies to the sauce, stirring gently to combine.  Make sure you don't boil the sauce or the sour cream will curdle.  Not the end of the world if it does, but best to just keep it at a warm temp rather than hot. Mine may have curdled a bit. It didn't affect the taste any.


Pour sauce evenly over the top of the rolled up tortillas and top with remaining cup of cheese.


Bake for 25 minutes and remove from oven.  Serve hot with excess sauce drizzled over top of enchiladas.


5-Minute Caramel Corn

A friend just posted a Facebook recipe on her page and I had to try it immediately.  It did not disappoint. I have a different caramel corn recipe that I make each Christmas that requires baking it for almost an hour.  It tastes great, but who has that much time on their hands most of the time?  When you are craving a sweet topping for your popcorn and would like it fast, this is a great way to go.  Note that the popcorn will be a bit soggy from this topping, but it tastes great!


Ingredients:

Popcorn--approximately 12 cups.  I use an air-popper to pop our corn.
1/2 c. butter, melted
1/2 c. brown sugar
Handful of mini-marshmallows (around 20)

Melt the butter in the microwave and stir in the brown sugar.  Put the marshmallows in and microwave it for about 20-30 seconds longer, or until the marshmallows begin to melt.  Stir until all ingredients are well combined and pour over the popcorn.

Roman Lasagna

A number of months ago, I posted my American lasagna recipe.  I specified that it was American because I knew I was going to post the recipe for Roman Lasagna at some point.  That time has now arrived.  This is an authentic Italian recipe--my husband's family lived in Italy for a few years a long time ago, and this is one of the recipes they brought back with them.  I can recall my mother-in-law making this one of the first times I came to visit when my husband and I were still dating.  It was delicious then and just as delicious now.  This is a meatless recipe (unless you add panchetta, but I never do), and a good way to get extra veggies in your meal.  The lasagna layers two kinds of sauces and 2 kinds of cheeses. The addition of nutmeg is imperative; I think it adds the best flavor to this dish...it's there, you can sense it, but it's not overpowering.  This is not a very fast recipe to make, and it does require a number of steps, but it's worth it!  Enough background information, time for the recipe! :)


Ingredients:

Red Sauce:
1/4 c. olive oil
1 carrot, shredded
1 stalk celery, finely chopped
1 small onion, chopped
panchetta (optional)
2 15-oz. cans tomato sauce
1 chicken bouillon cube
1 tsp. salt

1/8 tsp. pepper
White Sauce:
1/4 c. butter
1/4 c. flour
pinch of nutmeg (approx 1/4 tsp.)
1 1/4 c. milk

Lasagna noodles, cooked
Parmesan cheese
Mozzarella cheese

Oven Temp: 350 degrees
Baking Time: 30 minutes, or until heated through.

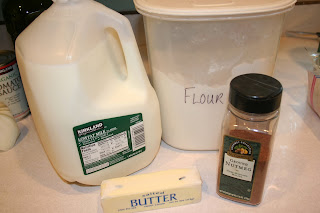
Gather all your ingredients together to start off--there are a lot that you need, so it's helpful to at least have them all handy.


I always start out by putting the water on to boil for the lasagna noodles.  Pretty simple.


Then, it's time to work on the red sauce while you wait for the water to heat up.  Here are the red sauce ingredients:


Start out by chopping up/grating the veggies and placing them into a pot with olive oil.


Saute the veggies for a few minutes.


Add the tomato sauce, salt, pepper, and chicken bouillon.  Stir well and allow to simmer, uncovered.


By now, your water should be boiling, so go ahead and throw the pasta in.


I find that lasagna has a tendency to stick together, so I also added some oil to the pot once the lasagna softened up a bit.  Boil until noodles are tender.


While the noodles are boiling, it's time to start working on the white sauce.


Place the butter in a medium saucepan and melt it at a med-low heat.  Add the butter and a pinch of nutmeg, stirring well.  Allow it to cook for a minute or two before adding the milk.


Add the milk.  Stir well and allow the sauce to thicken over med-low heat.


Meanwhile, the lasagna noodles are probably cooked and ready to be drained.


While you wait for the white sauce to finish thickening up, make sure to keep the lasagna noodles wet; I spray them with water and move them about a bit to keep them from sticking together.  You can also place a layer of the red sauce on the bottom of your 9x13" pan and place the first row of noodles on top of it.


By now the white sauce should have thickened and be ready to add to the lasagna.  You will be creating layers and repeating them about 6 times.  Noodles, red sauce, white sauce, Parmesan cheese...repeat!


When you come to the last layer of noodles, rather than topping the sauces with Parmesan, you're going to use mozzarella cheese.


Check out all the layers!


Bake for 30 minutes, then remove from oven and serve up nice and hot!  Goes great with a crusty loaf of bread and a garden salad!


Wednesday, October 23, 2013

Pumpkin Pancakes with Cinnamon Syrup

We had another can of pumpkin puree to use up, so my daughter requested pumpkin pancakes on Saturday morning.  We figured we'd give them a try and even made some cinnamon syrup to go along with them.  She loved them.  I just thought they were okay, but everyone has different tastes, so if you like pumpkins and cinnamon, you might really like this recipe.


Ingredients (pancakes)
3 c. milk
1 can pumpkin puree--15 oz.
2 eggs
4 Tbsp. veg oil
4 Tbsp. vinegar
4 c. flour
1/4 c. + 2 Tbsp. brown sugar
4 tsp. baking powder
2 tsp. baking soda
2 tsp. all spice
2 tsp. cinnamon
1 tsp. ginger
1 tsp. salt

Combine the first 5 ingredients and mix well.  In a 2nd bowl, combine all the dry ingredients and mix well.


At this point, simply combine the ingredients, mixing all of it together so that no dry areas remain. The batter will be a nice, thick consistency.


Pour about 1/4 cup per pancake onto a hot griddle.  Feel free to spread the batter out a little bit so the pancakes aren't too thick.


Within a couple of minutes, the pancakes will puff up quite a bit.


Once the edges of the pancakes look a little dry, it's time to flip them and cook the other side.


Press down gently so that the pancake cooks all the way through.


Once done, serve up with your favorite kind of syrup.


On this particular day we made cinnamon syrup (see recipe below), but other options would be to thin out the cream cheese frosting from the pumpkin bar recipe (by using extra milk to form a syrup consistency), using plain syrup, or adding toasted pecans in a buttery syrup.

Cinnamon Syrup

1 c. brown sugar
2 tsp. flour
1 tsp. cinnamon
splash of vanilla
1 c. water

Heat on stove top, stirring frequently, making sure there are no flour pieces remaining.  The syrup should begin to thicken; once it's at a normal syrup consistency, it's done.  Spoon onto your pancakes and serve!


Thursday, October 17, 2013

Applesauce

I've run into a number of people who have asked me how to make applesauce.  It's so simple that no one should be deprived of such knowledge.  And the taste is far superior to the nasty, grainy stuff they sell at the grocery store!  All you need to make applesauce is a large pot, a bunch of peeled, cored, sliced apples, and perhaps a bit of water.  Depending on how sweet your apples are, you can add sugar and cinnamon.  For a bit of variety, you can add red hot candies to your cooked applesauce instead, and allow them to melt...the applesauce turns pink and has that spicy cinnamon flavor to it.  Try this--it's so easy and SO good!!

Ingredients:

Apples, any variety
Sugar (optional)
cinnamon
water

Cook time: varies--can cook on the stove top or in a crock pot.

Start out by choosing a lot of apples that you want to make into sauce.  I used these honeygold apples from my friend's trees.


Next, peel the apples.  If you're lucky enough, you'll have one of those peel/core/slice devices that clamp to the counter.  I never liked mine, so I simply use a hand-held peeler and go to work on the apples.


I then slice/core the apples with my apple slicer.


At this point go ahead and toss the peeled apple slices into your cooking container of choice. I tend to make my applesauce on the stovetop.  I feel that my pots can hold far more applesauce than my crockpot can, and I tend to make things in bulk.


It never hurts to add about a half cup of water to the apples before you start cooking them.  This way they won't stick to the bottom of the pot when they begin to cook, before the juices start flowing. Go ahead and add a little water, then cover your pot and turn the stove on medium heat.  (If using a crock pot, turn it on low and let it cook away!)


After a short while, you'll notice that there are some bubbles forming in the pot.  At this point, you want to turn the heat down to a simmer.  You can remove the lid to stir from time to time, but always replace the lid while the apples continue to simmer and cook down.


Toward the end of the cooking time, when you stir the apples, they completely fall apart and turn into sauce.  If you don't care for chunky applesauce, continue to cook a bit longer (add a little water if you feel your applesauce is too thick) or blend into the consistency you like, using an immersion blender or a regular blender.  I am perfectly happy having a few lumps in my applesauce, so I don't do any extra blending.


Go ahead and add any sugar and cinnamon to your liking, being sure to thoroughly mix it in.  Serve warm or cold!