
I happened to make these again last night since we had a special occasion going on; a very belated birthday party for my daughter. I figured the girls who were at the slumber party might enjoy a cinnamon roll for breakfast the next morning. And I was right!
Homemade cinnamon rolls definitely take some time, more time than opening up a can of the pre-made refrigerated rolls, but nothing beats the taste of homemade. It is worth it!!
Here is the recipe I use, with directions throughout the content of this post:
Dough
1 c. warm milk
2 eggs
1/3 c. butter, melted
1/2 c. white sugar
4 1/2 c. bread flour
1 tsp. salt
2 1/2 tsp. yeast
Filling
1 c. packed brown sugar
2 1/2 Tbsp. ground cinnamon
1/3 c. butter, softened
Frosting
3 oz. cream cheese, softened
1/4 c. butter, softened
1/8 tsp. salt
1/2 tsp. maple extract (or vanilla, almond, or your favorite extract)
1 1/2 c. powdered sugar
First of all, I have to introduce my best kitchen helper. While I could make do without it, it sure lightens the load of all the things I make on an almost-daily basis. That would be my KitchenAid stand mixer!
**My KitchenAid**

We originally had a basic model, however, we make a lot of bread and other bread-related meals (think pizza, etc.) for our family of 6, so the professional model entered our lives as we feared we might burn out the motor of our basic model. (For the record, I prefer the design of the basic model compared to the professional series.)
The first step in making these cinnamon rolls is to create a nice environment for the yeast to thrive in. That means it needs to be someplace warm and sugary. So, grab a pan and pour in 1 cup of milk and the sugar. Toss the butter in along with it...you have to melt it anyway, so why not have fewer dishes to have to clean later and combine things now!
**milk, sugar, and butter on the stovetop**

Turn the burner on a low setting to gradually warm up the milk and melt the butter. Be sure to stir this well in the beginning so that the sugar dissolves. As things start to heat up, the butter will begin to melt.
**melting butter**

When your stick of butter starts to get about this small, remove the pan from the burner and allow the warmth of the milk to melt the remaining butter. That way you won't continue to heat the mixture to a point that is too warm for the yeast, which would kill it. You'll know it's the right temperature for adding yeast when it feels quite warm to your finger, but not burning hot. If the milk gets too warm, no big deal, just pop the pan in your fridge or leave it on your counter for a while to cool down. (Be sure it doesn't cool off too much though!)
Add the yeast to your milk concoction and while you allow the yeast a little time to proof, go ahead and add the dry ingredients to your mixer (flour and salt). Turn the mixer on low to give the ingredients a quick whirl.
**dry ingredients**

Then, add the liquid mixture and eggs to the mixing bowl and allow it to stir things up until well combined. It will be a heavy, slightly sticky dough.
**The dough will stick to the bottom of your mixing bowl, but that's not a big deal. When you go to remove it, just use a spatula to scrape it all out**

**Here is what your dough should look like when the mixing is done**

At this point, you need to let the dough rest and rise for a bit. The best way to do this is to cover the bowl with saran wrap. For all my bread recipes, I spray a quick blast of non-stick spray on the saran wrap just in case I happen to have over-achieving dough that rises to the top. (It has happened before, although it is not likely with this kind of dough!)
**Sheet of saran wrap about to go over the bowl. (Nice pineapple in the background!)**

Place the bowl in a warm location, if possible, to assist in the rising process. I often will quickly heat my oven to about 100 degrees, then shut it off and turn on the oven light and place the dough inside for the first rise. (I then close the oven door so the heat is contained.)
**Location for the 1st rise**

After about an hour, you should notice that your dough has risen, even if it's just a little bit. This isn't like a loaf of bread; don't expect to see amazing results.
**Dough after 1st rise**

Next, turn the dough out onto a lightly floured surface. Loosely cover it and allow it to rest for 10 minutes.
**Resting dough**

While you wait for the dough to rest, go ahead and put together the cinnamon sugar filling. (If you are wise, you will have taken out the 1/3 c. of butter in advance. I was not wise. I had to put my butter in the microwave for a few seconds in order to soften it up and make it spreadable.)
**Cinnamon sugar filling**

Now for the fun part...rolling out the dough! Grab a rolling pin and roll out the dough to a nice, large size. Maybe 24" x 18" or so.

Now is when you slather on the butter and then cover it with the cinnamon sugar mixture. Pretty easy!
**sugar-covered dough**

Next, start rolling up the dough!
**Dough roll**


Then grab some dental floss. Yep, you read that correctly. Go get some dental floss and tear off a strand about 12" in length. You will use this to cut your dough. Knives tend to squish the dough and cause the filling to spill out more. Dental floss is the secret weapon. Bonus points to you if you happen to have cinnamon flavored dental floss on hand!
**Dental floss...any kind will do**

Slide the dental floss under the roll of dough, cross the top strands, and tuck one under and through, the same way you would go about tying your shoe. (Hopefully you know how to tie your shoes...)
**Slicing the dough**
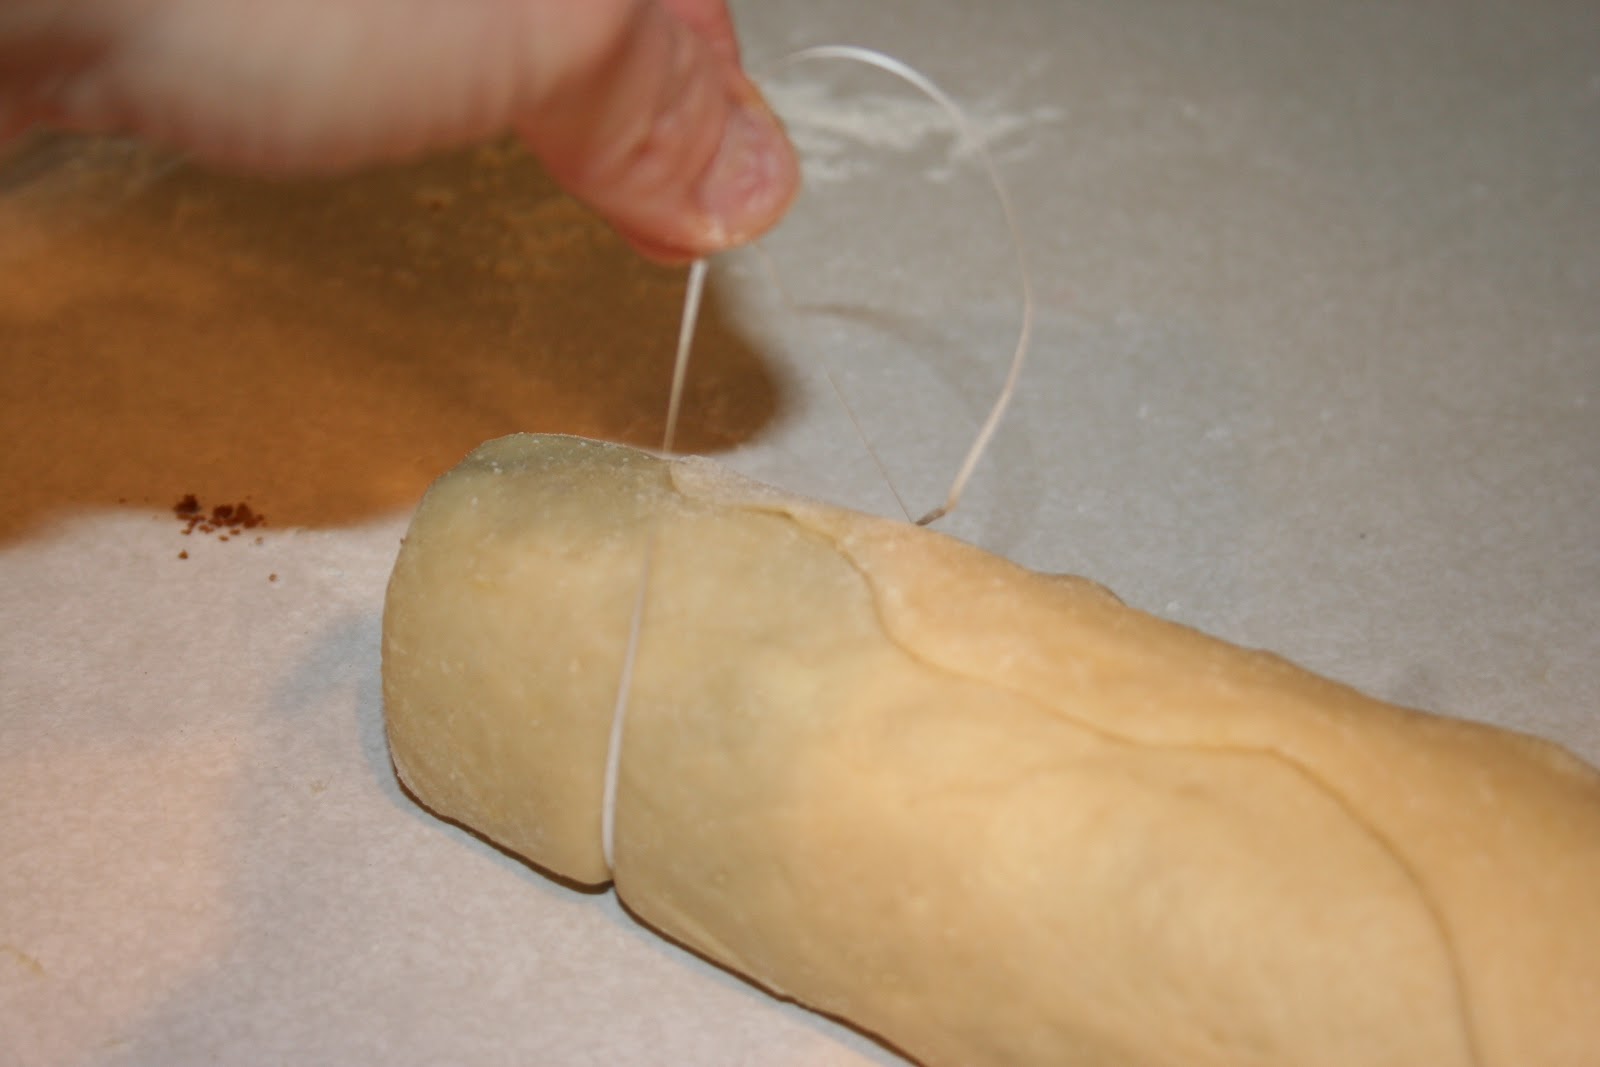
Next, after the floss is in place, you grab an end with each hand and pull in opposite directions. The floss slices straight through the dough. If I had 3 hands, I would have taken a picture of this step, but unfortunately you'll have to figure this one out on your own!
**After the floss has cut through the dough**

**A nice, clean cut through the dough; minimal filling spills out**

Cut the dough into however many rolls you would like and place them in a pan. The actual recipe calls for 12 rolls, but come on, that means in my family we each only get 2. I aim for closer to 18 rolls; they rise well, so having additional rolls is the way to go.
**I was able to cut 17 rolls out of the dough**

As you can see, there are some spaces between the rolls. I also didn't roll the last section of dough very tightly, so the rolls are not perfect. But, who cares about perfect. Does anyone really focus on looking at a cinnamon roll for very long? I think not. What matters is the taste!
At this point, you cover the rolls and allow them to rise for a while. I tend to make my cinnamon rolls at night. First of all, I am not a morning person. The thought of getting up at 6:00 to start making these things for my family just doesn't sound appealing. Secondly, you can accomplish 2 things at once when you make the rolls at night--the rolls can rise all night long while you can sleep! Where I live, my house is pretty cool (temperature wise) in the winter, so I simply let the dough rise on the top of the stove. If you live where it's warm, you may want to put the rolls in the fridge or another cool place to allow them a longer, slower rise. Use the same method to cover your rolls--saran wrap misted with non-stick spray--for this 2nd rise.
In the morning when you rise (pun fully intended), you will find your rolls have risen as well.
**Cinnamon rolls in the morning; the spaces between the rolls have disappeared**

They're almost ready! All that is left to do is to bake and frost them--easy!
Preheat your oven to 400 degrees and pop the rolls in when it's time. While your rolls bake (for 15-20 minutes), it's time to start the frosting. It's easiest to do this with a mixer, but I was up early this morning and rather than wake everyone up with a bunch of noise, I chose to mix the frosting by hand.
**Maple Frosting**

Keep an eye on your rolls; once they are browned to your liking, remove them from the oven.
**Baked rolls**

The last thing to do is to frost the cinnamon rolls. It's good to do it when they are warm but not hot. The frosting spreads the easiest when they have been out of the oven for a few minutes.
**Frosted cinnamon rolls**

Finally, because you are the one who made the rolls, it is often necessary to test one of them to make sure they meet the family's expectations. After all, you'd hate to disappoint everyone with a bad cinnamon roll, right?
**My taste-test subject**

One word: Delicious!
I hope you enjoy them, too!
No comments:
Post a Comment